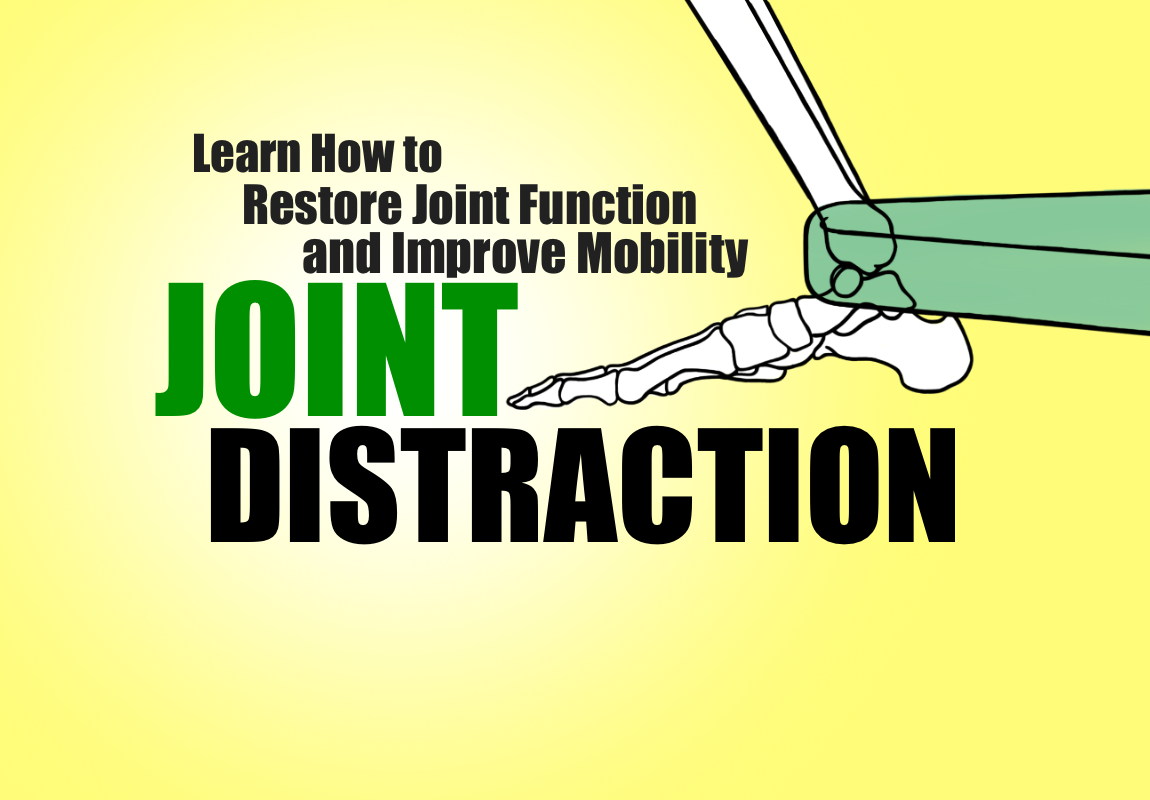
Learn how to restore Joint function and improve Mobility with one very effective technique!
We covered Joint Distractions in the Art of Stretching, but since this is such an effective technique that not many people practice, I wanted to revisit this technique is it’s own post. Also, I have provided a short recap for the PNF Stretching technique at the end of this post because we will get much improvement in our mobility when we combine PNF stretching and Joint Distraction exercises.
You’re trying to improve mobility? You stretch. Good. You practice Soft Tissue Therapy. Good. Now, it’s time to improve the functionality of your joints with this very effective technique called, Joint Distraction.
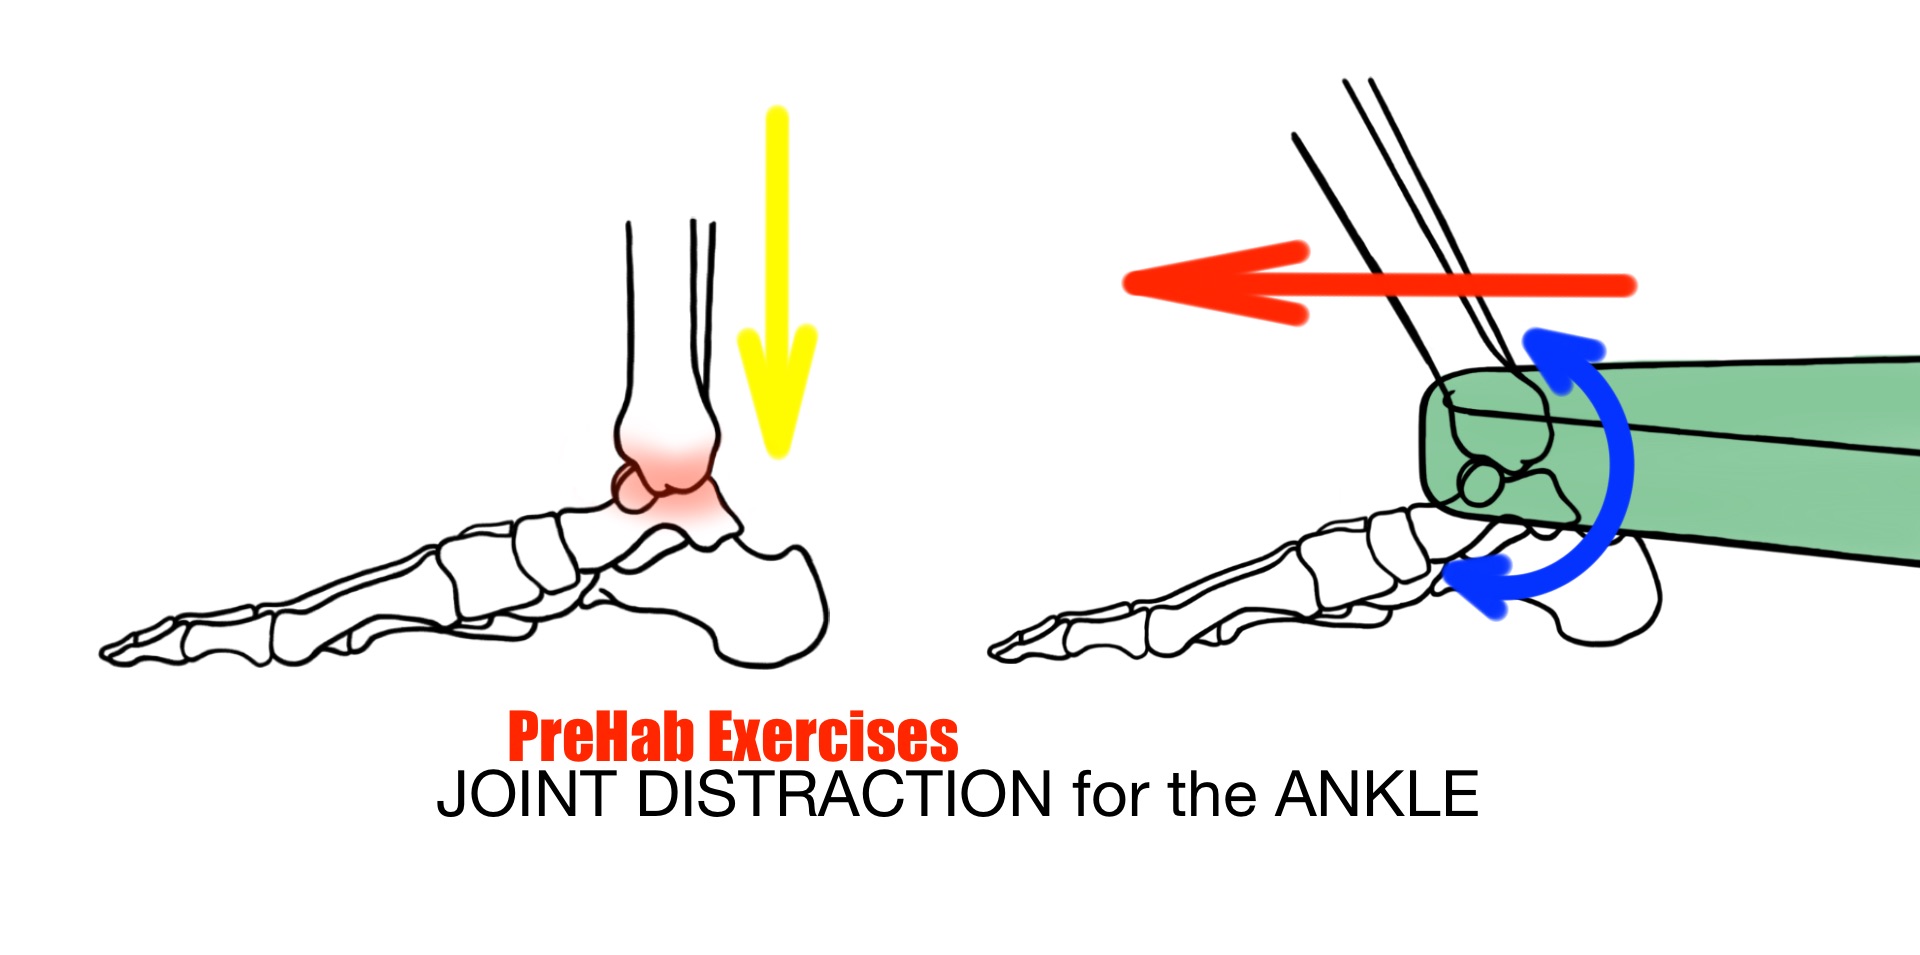
Joint Distraction is a type of mobility technique that we can incorporate into our stretching exercises in order to create more ‘space’ inside the joint complex.
More Space
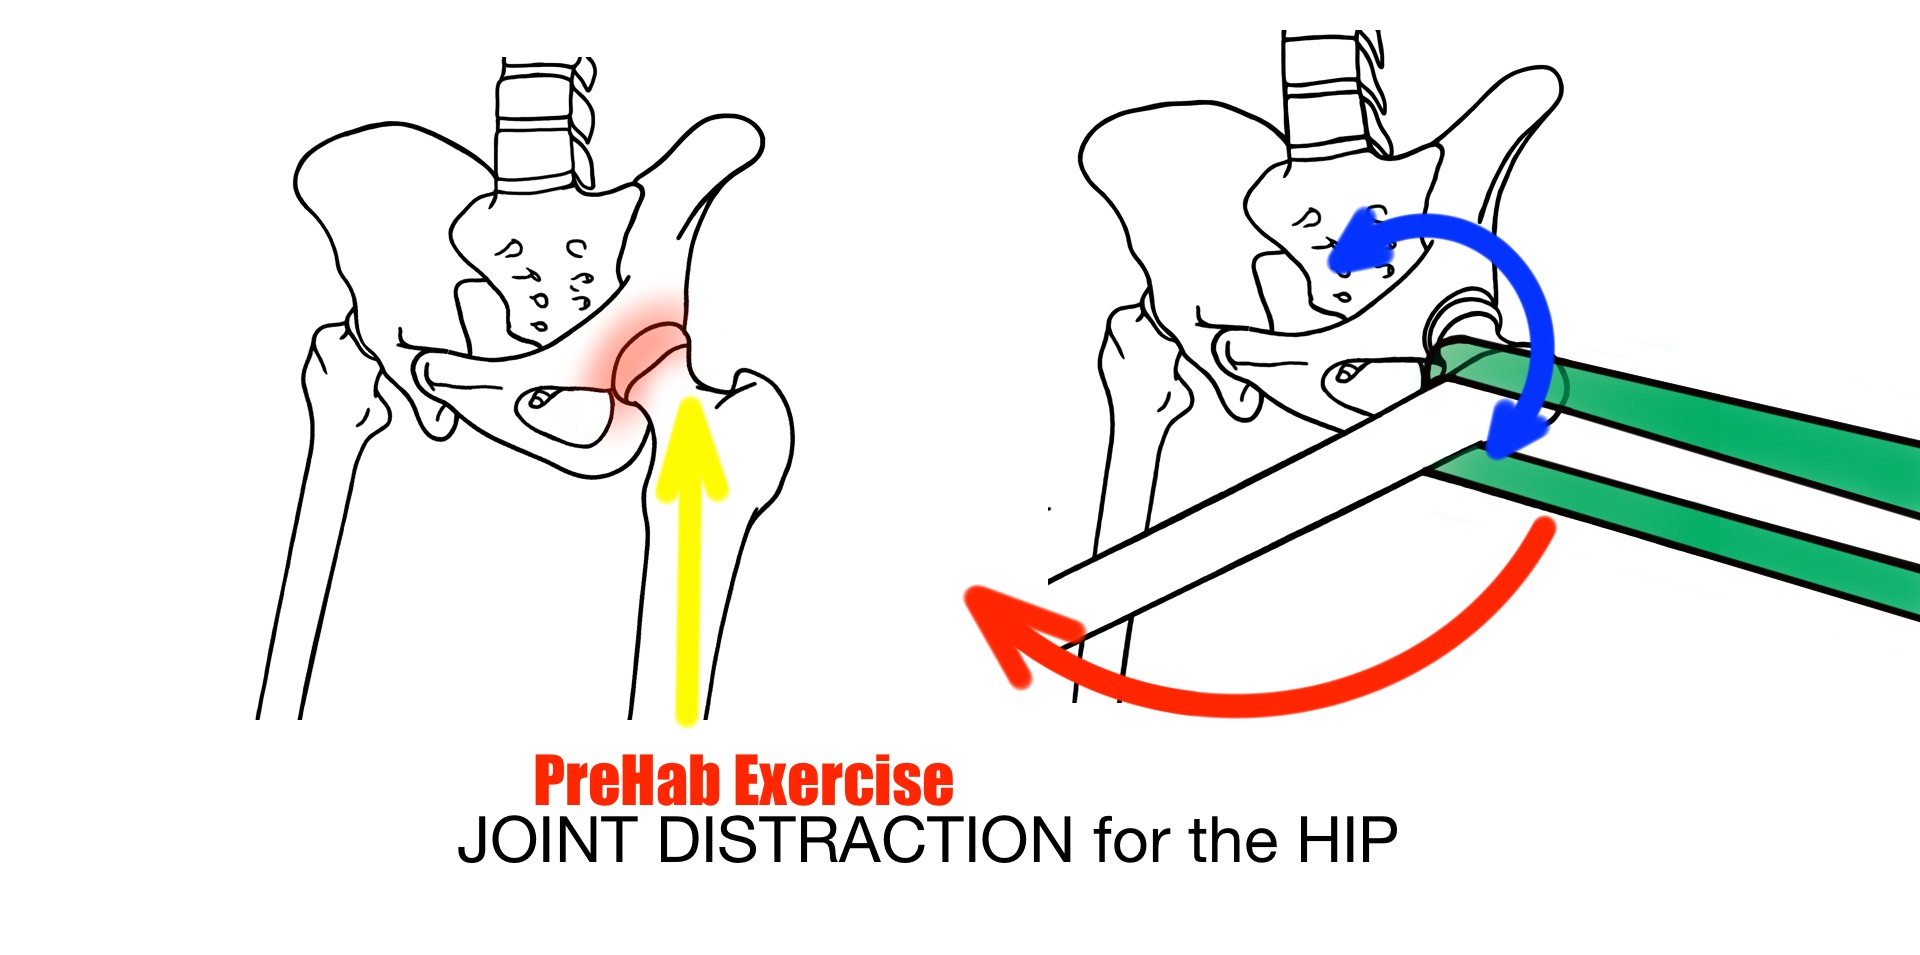
Most of the joints that we use for movement and exercise are Synovial Joints, which contain Synovial fluid that acts as lubrication between the articulating (moving) surfaces inside the joint. When the surrounding Soft Tissue is too tight and/or our movement mechanics are of a poor quality, the articulating surfaces inside the joint can compressed (pushed together) and experience an array of problems, one of which is that this Synovial fluid gets pushed out of the joint and other joint structures are damaged because there is no ‘space’ in the joint.
Fun in the Pool-
You’ve probably done this: you’re in the pool and you cup your hands into fist and start to squirt water at people by tightly pumping your fist. Do you know what I mean? Hopefully. Well, this is an analogy for how compression of a joint due to tightness in your Soft Tissue can actually pump Synovial fluid out of the joint, which leads to other consequences.
More Problems
Once we lose ‘space’ in a joint, we start to have other problems. A host of physiological structures in the joint, such as our Meniscus, Laburm, Cartilage, Synovial membranes, Bursas and even the bone, become structural compromised and/or deteriorate.
Bad to Worse
When we have a loss support of our joints’ physiological ‘cushions,’ articulating (moving) surfaces of the joint will literally start to sheer (wear away) each other unless there is some kind of intervention.
Compressed joints create an environment where the articulating (moving) surfaces with cause damage to one another and limit mobility.
Stop the Problem
Our next logical step is to stop the problem, correct? This means dealing with the issues that created the compression of the joint, right? Yes, and we’ve been doing that. We stretch and we practice plenty of Soft Tissue Therapy. So, what’s next? Addressing the joint itself and creating more ‘space’ that will allow greater fluidity and healthier movement.
Our Answer: Joint Distraction
Joint Distraction is used often in a physical therapy setting, but it can easily be applied by individuals like you and myself virtually anyway, at home, in the gym, down at the track.
What is a Joint Distraction Exercise?
Joint Distraction exercises use resistance band, foam roller or another object to create a ‘vector force’ that literally acts as a ‘wedge’ to separate the joint surfaces from one another. This separation of the articulating surfaces will provide more ‘space’ for Synovial fluid to fill the joint, reduce the amount of friction and allows for much more fluid motion.
In short, we use an object to wedge the joint open for more fluidity of movement.
Here are some illustrations depicting the mechanics principles behind a Joint Distraction exercise.
Upgrade Mobility
Now, we have the opportunity to truly upgrade our mobility! We have three separate techniques that help with different facets of our mobility. We do? Yes…
Joint Distractions are a great compliment to Soft Tissue Therapy and Stretching, especially the PNF techniques. The combination of all three techniques can greatly improve the way that you can move and should be incorporated into your personal Mobility Practice.
Holy Trinity of Mobility:
Soft Tissue Therapy helps restore length to the Soft Tissue
Stretching helps to restore Range of Motion to Movement Patterns
Joint Distractions helps to improve the function of individual Joints
These three techniques offer a powerful way to improve your mobility all on your own! I personally recommend that you integrate this combination of exercise techniques into your mobility practice. So, let’s get started on learning how to perform Joint Distraction exercises-
What you need:
You need a relatively strong resistance band that correlates to your level of experience and mobility practice. If you are a heavy lifter, you will want to use a heavier (stronger) band. If you are an agility athlete or runner, lighter band is good for you, but don’t go too light. We still need the band to be strong enough to affect your joints. I use a 35-50lb band and I am an agility athlete.
IF you are new to Joint Distraction, find an experienced coach or trainer to teach you this technique in person. Subtle changes in the placement of the band, as well as in the position of your body, can make a big difference. Don’t waste your time by doing it wrong or in a less than effective way. Find a professional to help you and get it right from the beginning. It will be worth it!
Let’s learn some Joint Distraction exercises!
Joint Distraction: Prone Ankle Stretch
This exercise will help improve the mobility at the ankle and foot, which will also affect how the rest of the body moves, especially in agility drills or running.
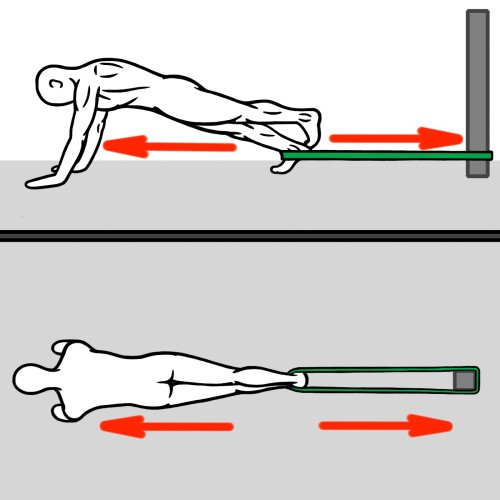
First, anchor the resistance band securely to a rack or pole. Safety first, please!
Next, wrap the band around your ankle and walk away from the anchor until the band gets tight and offers a firm resistance. Also, make sure that the band is positioned across the front of the ankle where the shinbones intersect with the foot.
Once the band is in place around the front of the ankle, walk the hands out on the ground until you are in a plank position. In this position, the band will begin to pull your foot away from your shinbone and thus make more ‘space’ in the ankle joint itself.
Next, adjust your positioning to explore different lines of action (pull of stretch) thought your foot, ankle and calf. Every time you modify your position, you essentially change the stretch and will feel different sensations through your ankle, which is good. We want to find the positions that work best for you. So, be creative and find all the positions that work best for you!
Finally, add in a PNF Stretching technique while performing this Joint Distraction exercise. Simply, cycle through a few Contract-and-Relax phases when you are the end Range of Motion in this stretch and allow your muscles to release, which will help the joint to open more.
Perform a Joint Distraction on each leg for 30+ seconds.
VIDEO: Joint Distraction – Ankle – Dorsiflexion – CLICK HERE
Joint Distraction: Kneeling Lunge
This exercise will target the Hip Flexors and increase the Range of Motion in Hip Extension, which will make a positive difference in the way that you run, jump, squat and more. This exercise is strongly recommended for individuals, especially athletes that sit much during the day. Open up those Hips and restore a full Range of Power to your Hip Extension!
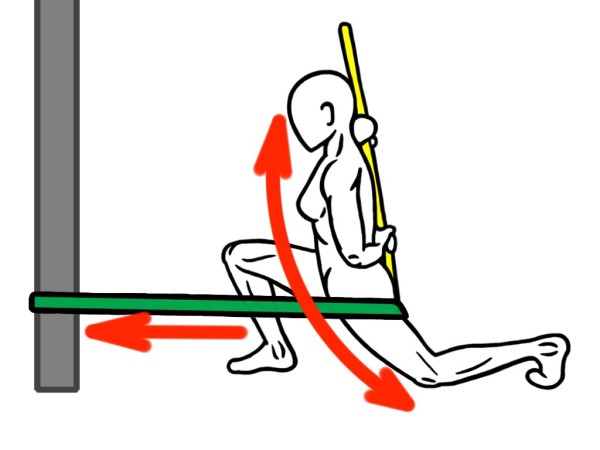
Anchor the resistance band securely to a rack or pole. Safety first, please!
Next, wrap the band around the top of your thigh as high as possible and kneel on the ground with the front of your hips pointing towards the anchor.
Now, slide your knee back as far as possible as you use a pole to help coordinate a stable and neutral spine. Brace your torso against the pole at the following three points of contact:
Three Points of Contact-
Back of Head
Rib Cage Behind the Heart
Tailbone
Next, make plenty of slight adjustments to change the line of action (stretch) through your Hips and Quadriceps. Explore different positions and the various sensations that you will feel with each. Once you have found a line of action that indicates the most tightness for you, then you are ready to apply a PNF Stretching technique to elicit a release in the muscles and further open up Hip Extension.
Now, we add in a PNF Stretching technique. With this exercise, we can apply either PNF technique: Contract-and-Relax or Contract-and-Hold. Both will effectively release tightness in the muscles and improve the Range of Motion of the Hip. So, try each technique on your own and repeat the one that you feel work best!
Perform a Joint Direction on each hip for 30+ seconds.
VIDEO: Joint Distraction – Hip Extension – CLICK HERE
Joint Distraction – Hip Flexion – CLICK HERE
Joint Direction: Hip Abduction
This exercise will aim to increase the Range of Motion of Hip Abduction and help stretch your Adductors (groin) muscles. This exercise is ideal for anyone that experienced difficulty with the Lateral Lunges, Squats or the Kickstand stretch.
Anchor the resistance band around a rack or a pole. Safety first, please!
Next, wrap the band around your thigh, up close towards your knee, as you position yourself in a Spider-Man Lunge (a longer version of a Kneeling Lunge). Make sure that band is pulled tight and your body is perpendicular to the band.
Now, make plenty of small adjustments and explore the different sensations that this stretch will offer you. You will want to keep modifying your position until your feel that you have found a line-of-action (stretch) that works the best.
Also, you can use your hand to help press the knee out wider. Or rotate through the torso and reach the arm up into the sky, which will rotate the hips slightly and create a degree of External Rotation in the Hip Socket.
Next, add in the Contract-and-Relax PNF Stretching technique. This combination will greatly help to lengthen of your Adductors (groin) muscles and increase the Range of Motion in Hip Abduction.
Perform a Joint Direction on each hip for 30+ seconds.
Joint Distraction: Hip Flexion
This exercise will help increase the Range of Motion in Hip Flexion, which is very beneficial to anyone who is looking to improve their Hip Mobility and get better at the squat or Deadlift.

Anchor the resistance band around a rack of a secure pole and then wrap the other side around your thigh as high as possible. Next, turn and face away from the anchor and walk out until the band is tight. Make sure that you position the band as high as possible on your thigh, as well as at the anchor point, in order to provide maximum affect at the Hip Socket.
Now, place your hands on the ground and walk out into a Down Dog position. Then sink the heels into the ground and press your tailbone to the sky as you make plenty of small adjustments and explore the various sensations of each position. Once you find the best line-of-action (stretch) in Down Dog, we are ready to apply a PNF Stretching Technique.
Next, cycle through a few phases of the Contract-and-Relax PNF Stretching technique and make even more of a positive difference in your Hip Flexion.
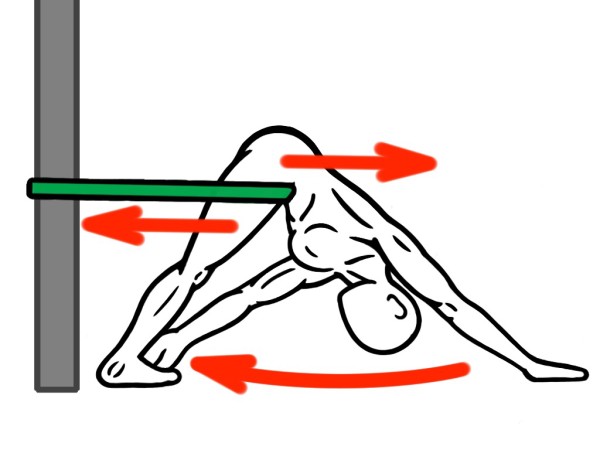
Finally, you can change up the line-of-action (stretch) even more by taking a hand and reaching for the opposite ankle. This is the Ankle Touch from the Down Dog series of Active Stretching. Make some more mirror adjustments and explore the various sensations until you can feel you have found a position that offers the best affect in regards to Joint Distraction.
Add in another few cycles of Contract-and-Relax here too.
Perform Joint Distraction on each hip for 30+ seconds.
VIDEO: Joint Distraction – Hip Flexion – CLICK HERE
Joint Distraction: Pigeon Pose
This next Joint Distraction exercise will use the Pigeon Pose from Yoga to improve Hip Mobility and simultaneously increase the Range of Motion in the three joint actions of: Hip Flexion, Hip Abduction and External Rotation.
This stretch is ideal for individuals that want to improve their ability to squat.
Anchor the resistance band around a rack or a pole and then wrap the other side around the middle of your thigh as you get into Pigeon Pose.
Get into Pigeon Pose by folding one leg under the torso and aligning the shin in a perpendicular angle to the spine the best as you can. Then lower your hips to the floor and walk your hands out as you lay your torso over top of your folded leg.
Now, you will want to make some mirror adjustments in your alignment in order to find the position that works best for you. In this exercise, everyone will experience a vast difference in what position works best for them. So, take some time to explore various positions and find an alignment that works best for you.
Once you have found the best positioning, it’s time to add in a few cycles of the Contract-and-Relax PNF Stretching technique. The combination of PNF Stretching and Joint Distraction in Pigeon Pose should do wonders for your Hip Mobility!
Perform Joint Distraction in Pigeon for 30+ seconds on each side.
Joint Distraction: Bully Stretch for the Shoulder Girdle
This next Joint Distraction exercise will focus on your upper body, specifically your Shoulder Girdle. Many of us are too restricted through the anterior (front) side of our torso, including our Shoulder Girdle. This Distraction exercise will help to retract your Shoulder Girdle and release some tightness in your Chest, Lats and Trapz.
This stretch is ideal for individuals that have protracted Shoulders and overdeveloped Pectorals (Chest) and Lats (Back). Perfect to use before and after Upper Body Pushes and Pulls, i.e. push-ups, pull-ups, presses and more.
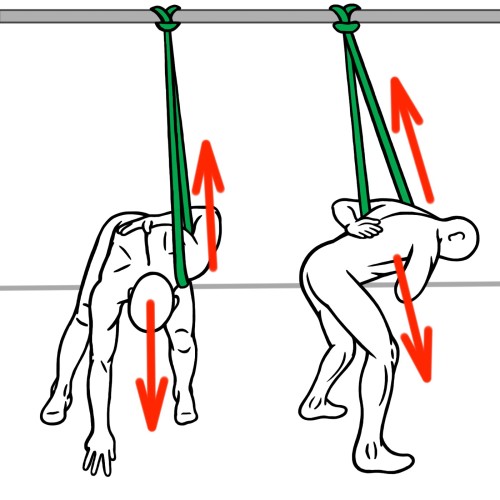
Anchor the resistance band around a secure rack or a pole that is elevated and then wrap the other side around your shoulder. Make sure that is can securely pull your Shoulder Joint backwards into Retraction.
Now, walk forward until the band gets tight and then reach the bound hand up your back towards your heart.
You will want to make some mirror adjustments in your alignment in order to find the position that works best for you. We want to feel the musculature of the chest and shoulder opening up. So, take some time to explore various positions and find an alignment that works best for you.
Once you have found the best positioning, it’s time to add in a few cycles of the Contract-and-Relax PNF Stretching technique. The combination of PNF Stretching and Joint Distraction in this Bully Stretch will do wonders for your Shoulder Mobility.
Perform Joint Distraction in Bully for 30+ seconds on each side.
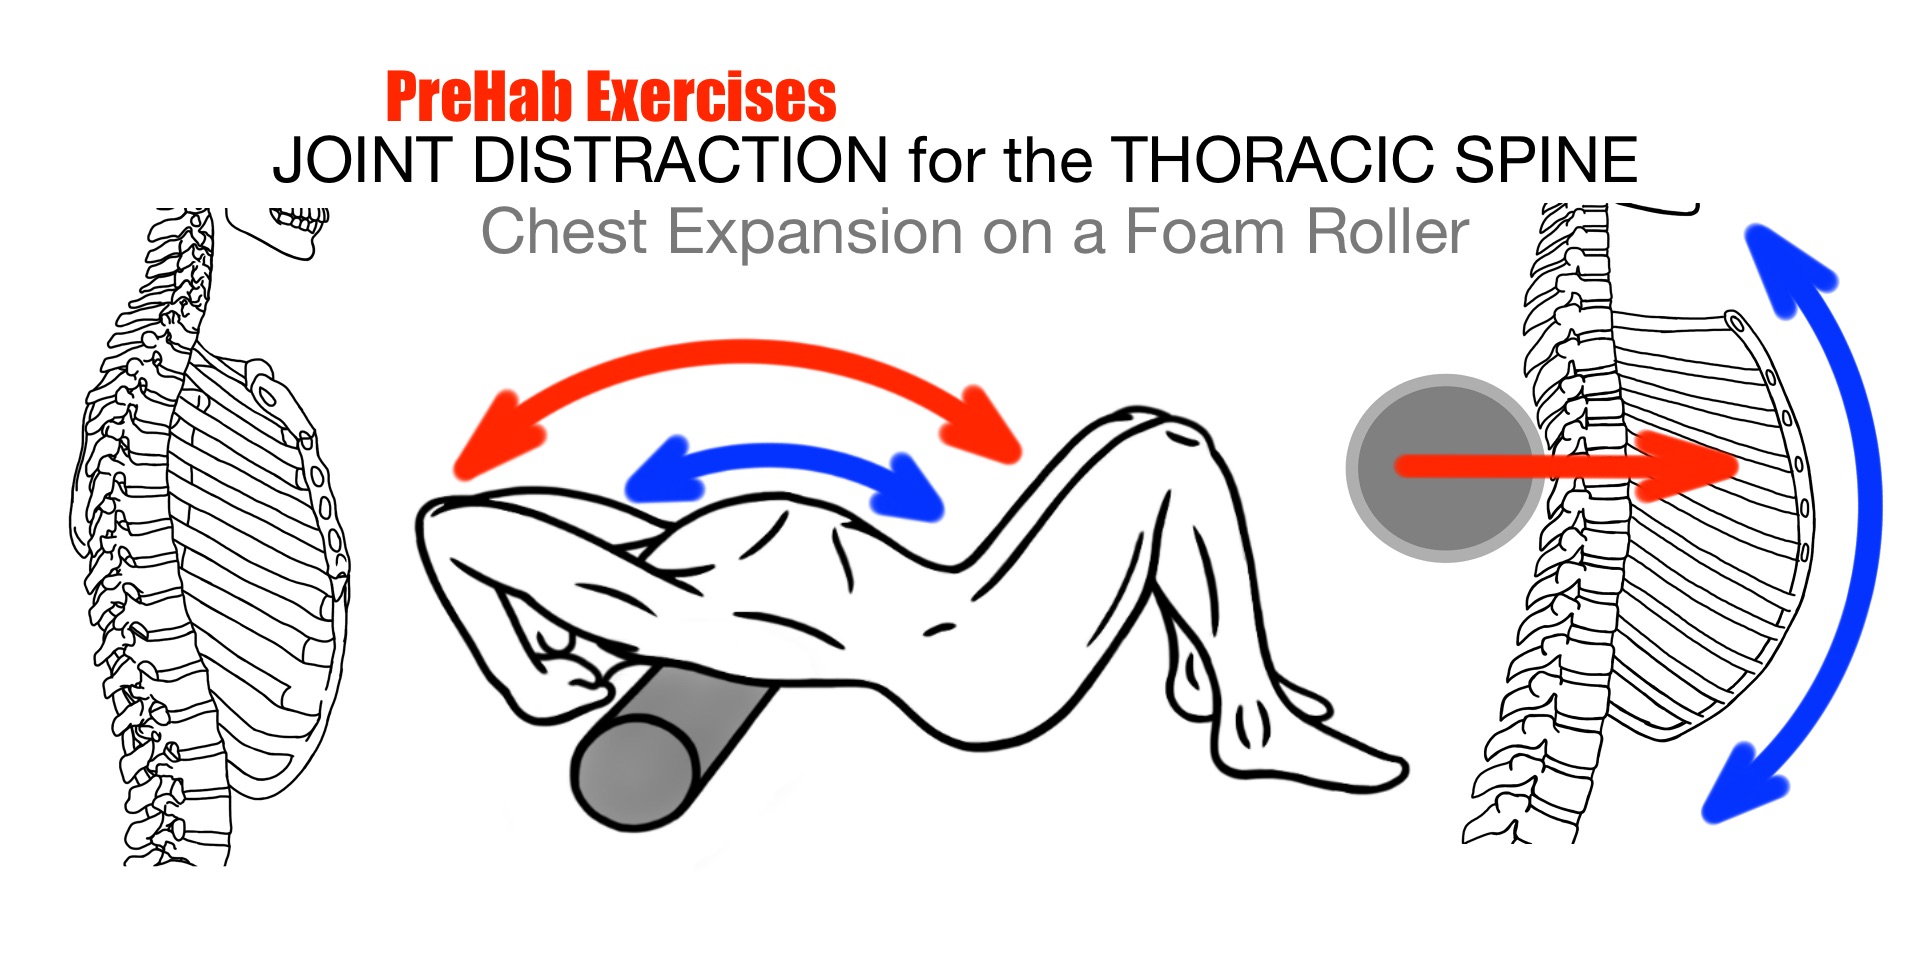
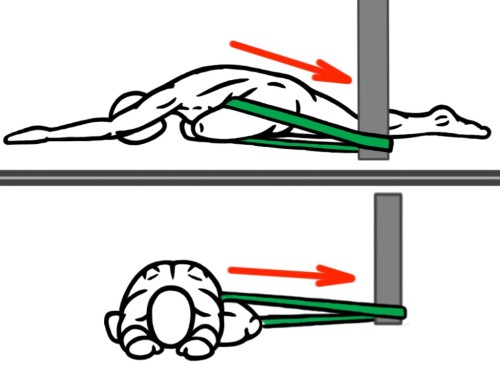
Joint Distraction: Thoracic Spine Extension
This exercise is going to help expand the anterior (front) side of our Thoracic Spine, which tends to be very tight and restricted on many people. We will change up our tools as we drop a resistance band for a Foam Roller or a Yoga block or a bunch of pillows. Feel free to be as creative as necessary!
This exercise is perfect for anyone that lacks mobility through their Thoracic Spine and this usually includes people who work on a computer, drive a lot, do many ‘pushing’ exercises and/or wear heavy backpacks.
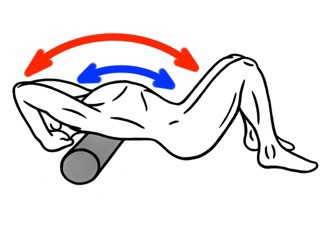
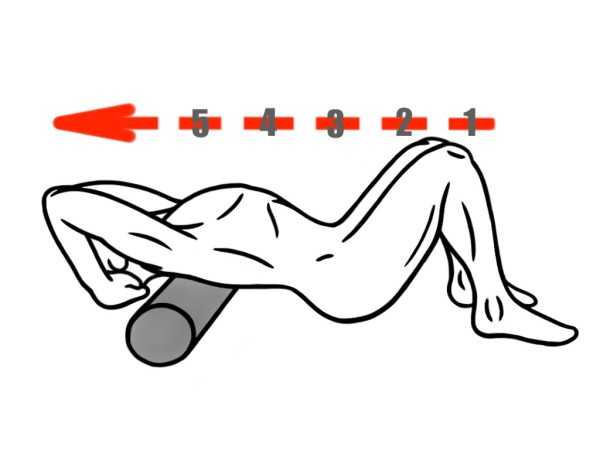
Place the roller on the ground and lay your torso over top of it. Position your heart directly over the roller. Interlace your hands behind your head and tuck your chin into your neck. No cranking the neck. Look up at the sky and lengthen the spine through the top of your head.
Now, focus on long, deep exhales and you activate the musculature in your upper back as if you are stretching first thing in the morning when you get out of bed. It should feel a bit like Cobra Pose in yoga and this little stretch/activation is all you need to start cycling in the Reciprocal Inhibition – PNF Stretching technique.
After your practice the PNF technique, change your position on the roller slightly. Move an inch or less in either direction – up or down – and then repeat another Reciprocal Inhibition PNF Stretch.
Keep making some little adjustments in your positions and find several spots that work well for you.
Perform Joint Distraction on your Thoracic Spine over a Roller for 30+ seconds.
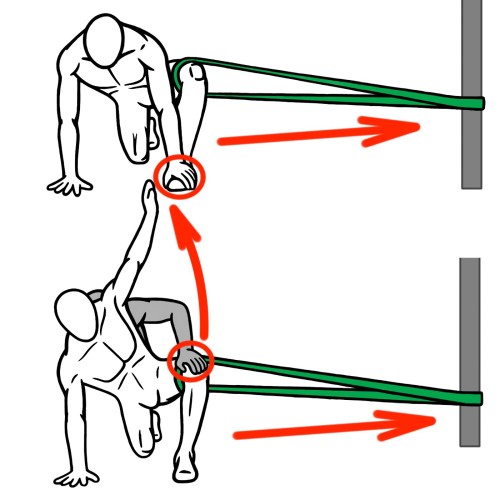
Joint Distraction: Arm Circles
We have another Joint Distraction exercise that we can perform on top of a roller for the Chest and Shoulders. In this exercise, we can combine Joint Distraction with Active Stretching and/or PNF Reciprocal Inhibition Stretching.
This stretch is ideal for individuals that want to open up the anterior (front) side of their Chest, Shoulders and Thoracic Cavity.
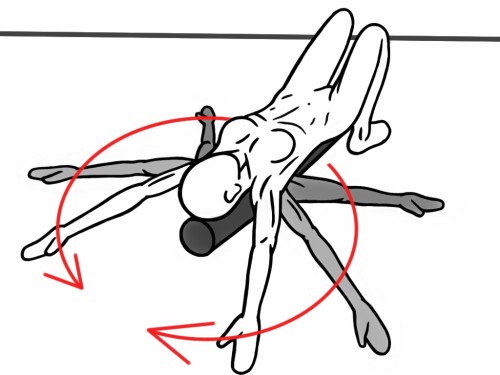
Lie on top of a foam roller with the roller positioned directly beneath your spine from head to tailbone. Then plant your feet firmly on the ground for support and drop your arms out to the sides.
Now, breathe and relax. Focus on making very large and deep exhalations to help your muscles release. Exhale out on a count of 8+ and inhale on 4.
Next, start to circle your arms up over hand as you keep your fingers in touch with the floor. If your fingers come up off the floor, it’s an indicator that you are very tight through the anterior (front) side of your torso. You will want to include more Soft Tissue Therapy and Stretching to your Chest, Shoulders, Lats and even Trapz.
Active Stretching: Move the arms smoothly and continuously as you bring your hands together overhead and then back down to alongside of your body. If you feel particularly tight areas, pass through them several more times as you focus on exhaling.
Practice Active Stretching for 30+ seconds.
Next, explore various positions and seek out the tightest strands or spots of resistance. Then place your arms in these positions and add in some PNF Reciprocal Inhibition cycles. Press the arms down into the ground and then release. Repeat this action a few more times.
Also, pull the belly button down towards the roller to engage the abdominals and stabilize the spine. This action will anchor the lower ribs and force the Soft Tissue of the Thoracic Cavity to release under Reciprocal Inhibition.
Perform PNF Reciprocal Inhibition for 3+ Cycles in the tightest positions in this exercise.
More Exercises-
Now, that we just covered several major Movement Patterns and Joint Actions, it’s time for you to start including some Joint Distractions into your own personal practice.
Also, you don’t need to just do these. There are many other Joint Distractions exercises available and I am sure that you can create some new ones yourself!
So, get to it and keep getting better!
Before you go, down below is a quick recap of the PNF Stretching Techniques in case you want to review them.
Lastly, any questions or comments, please let me know!
Email me at Michael@prehabexercises.com
Also, feel free to sign up for my emails series where you will learn more techniques and exercises to help build your own Prehab practice!
Guidelines to PNF Stretching
Since we continually refer back to PNF Stretching as a recommended combination to Joint Distractions, here is a brief recap of the technique-
Proprioceptor Neuromuscular Facilitation (PNF) is a stretching technique that has been proven to be very effective at increasing Range of Motion and improving mobility.
Personally, I believe that PNF is the best kind of stretching that any one can practice because it is effective and it is very applicable. What I mean is that you can easily apply this technique to any stretch as well as any Movement Pattern. In other words, you can go back to all of the previous stretches that we have already covered and add a PNF technique to make them better!
Bottom line: PNF is proven to be effective and is also very applicable.
What is a PNF technique?
PNF stands for Proprioceptor Neuromuscular Facilitation, which may sound like a bunch of daunting scientific jargon that is difficult to understand, but its actually quite simple.
Defining PNF Techniques
Here is a rather simplistic way of understanding what Proprioceptor Neuromuscular Facilitation is and how it works.
• Proprioceptors are sensory neurons located in the muscles, tendons and even skin. Their role is to sense movement, temperature or touch and communicate data back through the Nervous System.
• Neuromuscular simply refers to all things that pertain to the Neuromuscular System, which is the combination of our Nervous System and muscles (including tendons, fascia and ligaments).
• Facilitation is basically a fancy word for ‘operating,’ ‘using’ or ‘turning-on.’
When we put it all together:
PNF stretching is a technique that ‘turns on sensory neurons in order to use the muscles [more effectively].’
Another way of saying it is that we are using the proprioceptors (sensory neurons) in order to improve the Range of Motion of our Neuromuscular System (muscles).
Number of Techniques
There are actually a number of different kinds of PNF techniques to choose from. In our case, we will just focus on two that are relatively simple to understand and very practical in their application.
We will go over the following PNF techniques:
• Autogenic Inhibition – using a contraction of a muscle to elicit (create) a release of the microfibers that create the tightness or stiffness in the Soft Tissue and limits the Range of Motion of the corresponding joints.
• Reciprocal Inhibition – the act of contracting a muscle (antagonist) to elicit (create) the release in the reciprocal muscles (agonist) and restore length to the Soft Tissue while increasing the Range of Motion at the corresponding joints.
Both of these PNF techniques will use a ‘cycling phase’ of muscle contractions in order to elicit a release of the microfibers that hold or bond the muscle and Soft Tissue in a shorten state. This cycling phase is quite easy to perform too.
Let’s go over the ‘cycling phases’ of these techniques-
PNF Stretching
Autogenic Inhibition – The Cycle Phase of ‘Contract-and-Relax’:
5 Seconds of Contraction at 1/8-1/4 of Max Muscular Strength
10 Seconds of Relaxation – No Contraction
5 Seconds of Contraction at 1/8-1/4 of Max Muscular Strength
10 Seconds of Relaxation – No Contraction
5 Seconds of Contraction at 1/8-1/4 of Max Muscular Strength
20+ Seconds of Relaxation – No Contraction
The Stretch is completed – there should be a noticeable different in the Range of Motion of the corresponding joint actions.
Recap:
Instruction for Autogenic Inhibition technique for PNF Stretching
Contract-and-Relax in :05/:10 second ratios for 3+ Cycles.
PNF Stretch
Reciprocal Inhibition – The Cycle Phase of ‘Contract-and-Hold’:
5 Seconds of Contraction at 1/8-1/4 of Max Muscular Strength
10 Seconds of Hold – No Contraction
5 Seconds of Contraction at 1/8-1/4 of Max Muscular Strength
10 Seconds of Hold – No Contraction
5 Seconds of Contraction at 1/8-1/4 of Max Muscular Strength
20+ Seconds of Hold – No Contraction
The Stretch is completed – there should be a noticeable different in the Range of Motion of the corresponding joint actions.
Recap:
Instruction for Reciprocal Inhibition technique for PNF Stretching
Contract-and-Hold in 5:10 second ratios for 3+ Cycles.
Here are some videos of Joint Distraction exercises:
Joint Distraction – Hip Extension – CLICK HERE
Joint Distraction – Hip Flexion – CLICK HERE
Joint Distraction – Ankle – Dorsiflexion – CLICK HERE
Thanks for reading-
Great! Now, we covered the Joint Distraction techniques and reviewed PNF Stretching. It’s time to integrate into your Mobility practice – today!
Create some freedom in your joints and restore fluidity to your motion-
If you have questions, email me at Michael@prehabexercises.com!
And if you want more tips, sign up for my email series and build your own PreHab practice.
Good luck and keep getting better!
Michael