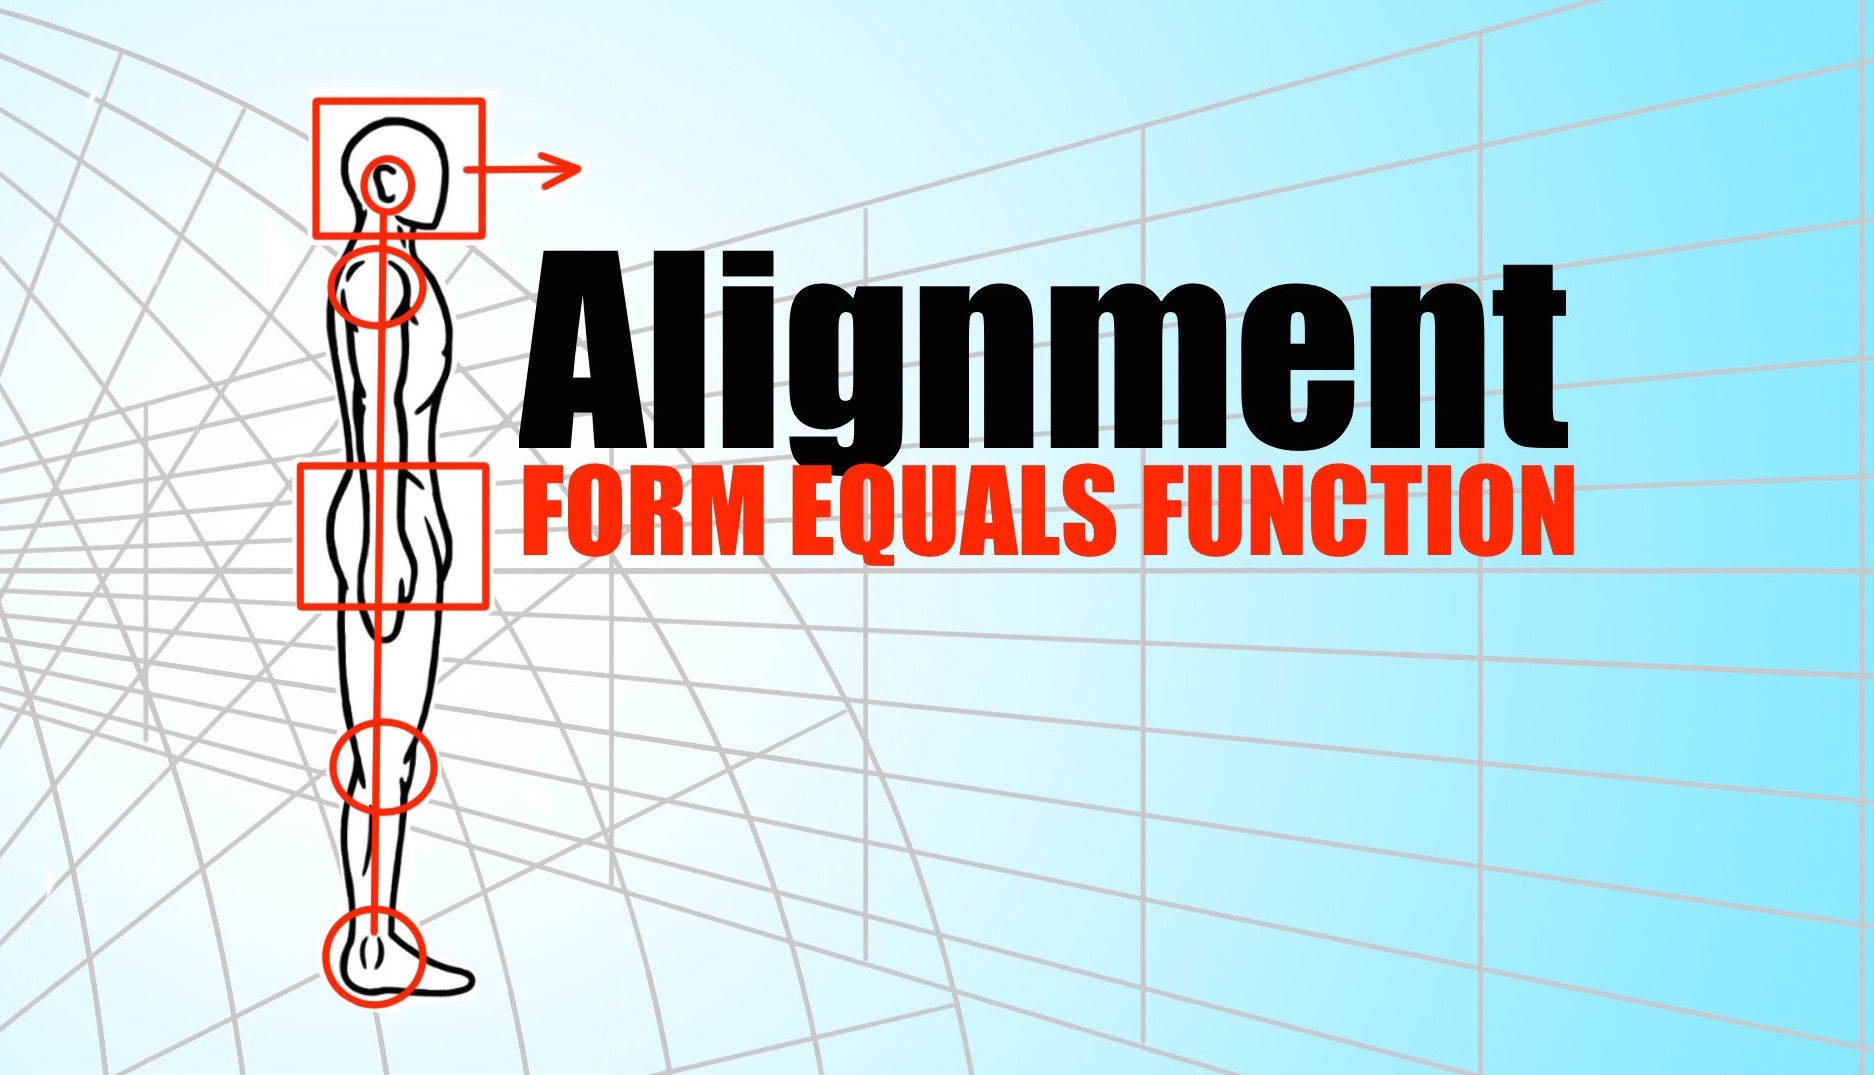
If you’ve been training hard and competing to get yourself better, it’s time you look your alignment, in movement as well as stationary, because ‘form equals function’.
Improving your performance will involve improving your movement and that requires an awareness and development of your alignment – in all positions.
Stop and take a look at yourself now. Look at the position of your body. Where are your shoulders in relation to your hips? What is your spine doing? Is it bending or curving in a particular direction? Yes, this is a pop quiz. Oh, you were not ready for it. Sorry, but it still counts because alignment matters – always. However, let’s take a step back and get a better idea of what alignment is before we throw the baby out with the bath water, so to speak.
What is alignment?
In layman terms, alignment in the human body refers to how we move and hold ourselves together as there is “alignment” in both your posture and your movements. At the same time, Katy Bowman, MS, a biomechanist and the author of Alignment Matters and Move Your DNA, will tell you that your body is continuously subjected to a combination of forces, such as torque, leverage and gravity, every second of every day and that your alignment is shaping your body into what it looks like and how it performs when it counts.
Why does alignment matter?
Bowman will tell you that not only does your alignment affect how you move/perform and also dictate your current (and future) state of Wellness, it will eventually also dictate your future diseases and health predicaments, including injuries. Furthermore, if we do not correct our alignment, then other parts of our body will become prematurely wore down from absorbing an inappropriate amount of stress (torque or force) produced by our movements, which will eventually lead to injury and/or disease. Not ideal.
In regards to alignment,form equals function in our movements and our biology.
Alignment Affecting Performance-
A lot of coaches will tell you that in order to perform well in anything we have to move well because movement is the basic component of performing. Then in order to move well, we would need to know (and practice) the correct form and alignment of specifics movements. In other words, I can’t throw a curve ball for a strike if I do not know (nor practice) the mechanics involved.
Alignment is the foundation of movement and a key ingredient in every great performance.
Alignment Experiment:
Let’s do a little experiment to see if alignment can make a difference for you. Find an office like chair and sit in it. Now, drop your chest down, thrust your chin forward, slide your hips forward and turn your feet onto their sides. Stay there for 60 seconds or so and then answer these questions: Do, you feel confident? Do you feel grounded? Do you feel smart?
Now, get up and stand tall. Toes pointed forward, squeeze your glutes and push the hips forward. Now, pull the belly button in towards your spine and slide your hips back over your ankle bones. Pull the shoulders down and away from your ears and imagine that you are parking your shoulder blades into your back pockets while tiny strings pull your armpits down towards your front pockets. Firm up your abdominals and press the very top of your head up towards the sky as you tuck your chin back in towards your Adam’s apple. Now, relax your jaw and easily gaze at the horizon, which should intersect perfectly with the midpoint in your line of sight. Do you feel confident? Do you feel grounded? Do you feel smart?
Alignment makes a difference, which is why you will need to develop an awareness of it if you are looking to perform better in your life and your sport. It is more than just geometry and physics, and it’s more than just the accumulation of joint angles and load or torque forces on them. Alignment is a map of how you move collectively – the accumulation of your movement patterns and lifestyle habits.
Looking at your body’s alignment is an excellent start to developing functional movement that will fulfill task-oriented performance in life with optimal efficiency.
Living in a Modern World
Chances are if you work on a computer and sit at a desk your head protrudes forward. The muscles at the base of your skull and back of your neck are tight from overuse. The detailed movements that allow you to read what is on your computer screen interfere with proper alignment of your head and neck.
Using alignment to see what your movement habits and lifestyle has done to you is an effective way to identify biomechanical problems. Once you know where your alignment is off, you can plot an effective course to bring you closer to natural movement patterns and better performance in life. Our modern-world lifestyle is full of solutions and devices that have reduced the quantity of movement, as Bowman says. In other words, humankind has continuously been looking for new ways to move less to make life easier. Without even knowing it, this has actually made our lives harder by diminishing our ability to move well and properly function.
Evaluating our alignment is the first step to restoring the functionality of our bodies and thus improving how we perform in everything.
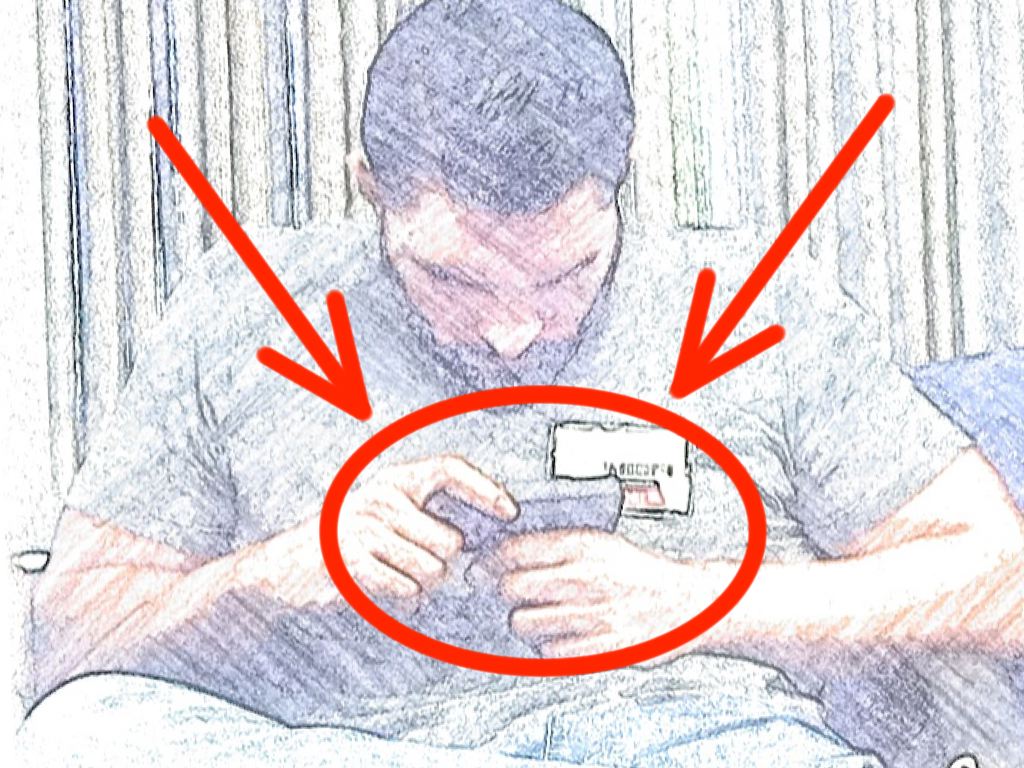
How do you sit? How do you sit and text?
You can set forth a large precedence for change through cultivating an ongoing awareness of your alignment. The more that you can check in with how you are positioned and how you are moving, the more chances you have to correct your alignment. Yet, alignment is not a one-and-done with kind of game. You don’t just check in with you alignment at noon every day, make a few corrections and be good for the rest of the afternoon. According to Bowman, your alignment is a living compilation of your lifestyle behaviors and what you do more often is more impactful than what you may do deliberately.
Where to start? Start at your feet.
You have to start somewhere, right? Start with the feet as they are the platform in which to operate from and you can learn a lot from your feet.
In an EFTI seminar with Lenny Parracino, The Foot: The First Link in the Kinetic Chain, I learned to evaluate our habitual alignment by looking at the bottom of the feet.
Here’s how it works:
Take off your shoes and socks and examine the bottoms of the feet. Next, look at where the calluses are located and compare the densities. The more dense the callus, the more pressure that part of the foot receives over time, which points to where your true center of gravity is.
Ideally, you want to have an even amount of density across all five balls of the feet and the heel, with some lighter calluses running along the outside ridge of the foot.
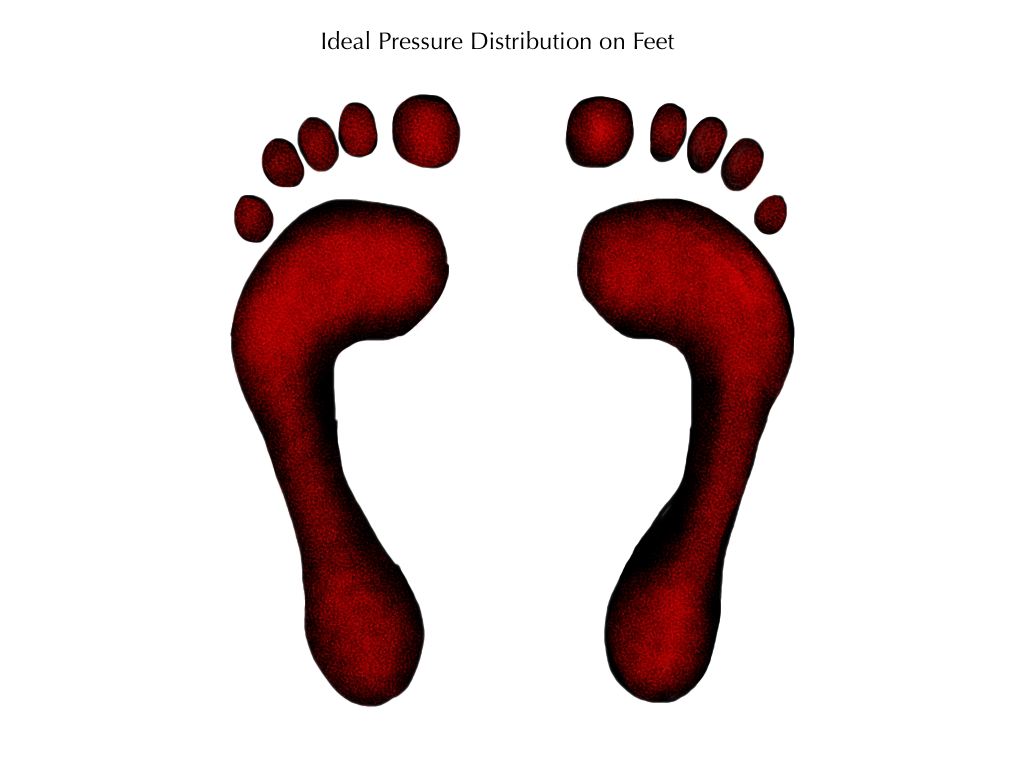
Ideal Pressure Distribution on Feet
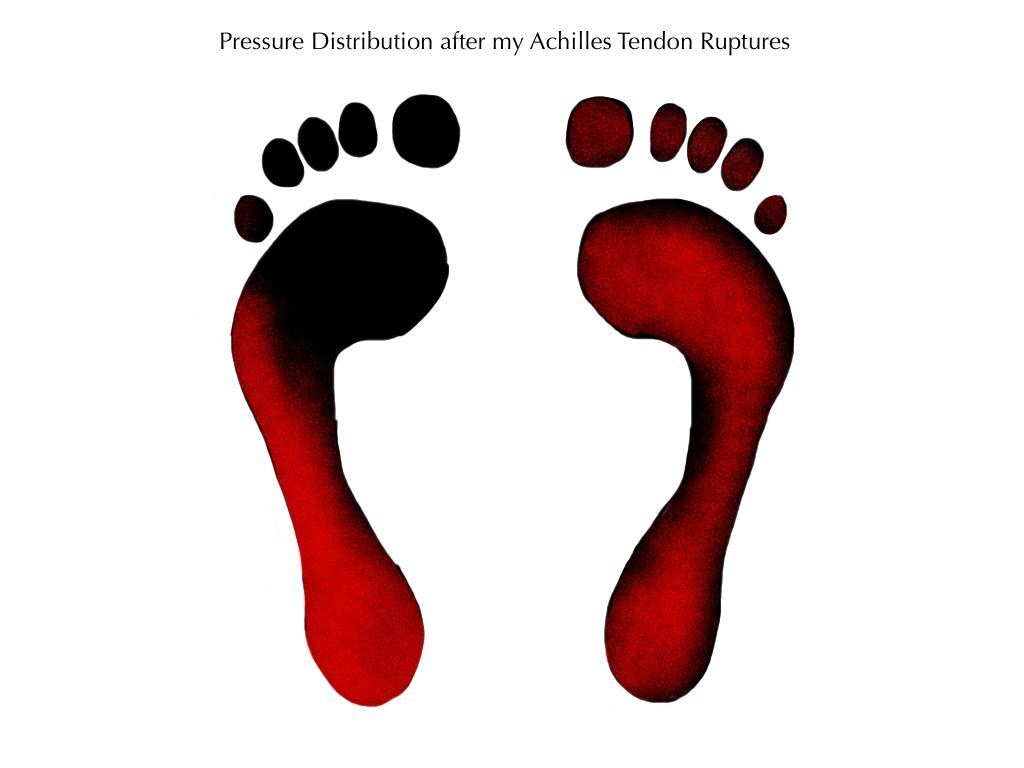
Pressure Distribution after my Achilles Tendon Ruptures
You can compare the ideal Foot Perspective below on the left to my results at the time of this seminar. I have since then changed the location of the calluses on my feet – thankfully!
Evaluating Your Standing Alignment
It’s time to get practical again and assess your standing alignment in a couple of primary, static positions. This will allow you to assess your movement habits and any dysfunctional or compensating strategies. It’s wise to take some notes and put them in a safe place for future comparison because if there is no change over time, the actions you think you are taking are not being effective.
Evaluate from the ground up:
Foot to hip to ribs to shoulders to head.
If you still have your shoes on, take them off. You may also want to consider switching to minimalist shoes if you have not all ready. In her book, Every Woman’s Guide to Foot Pain Relief, Bowman explains the pitfalls of wearing a shoe that has a heel and that goes for men as well. Even a one-inch heel in your basic running shoe will create an angled platform in which your entire body will operate from. So, start to consider switching to minimalist footwear – both men and women.
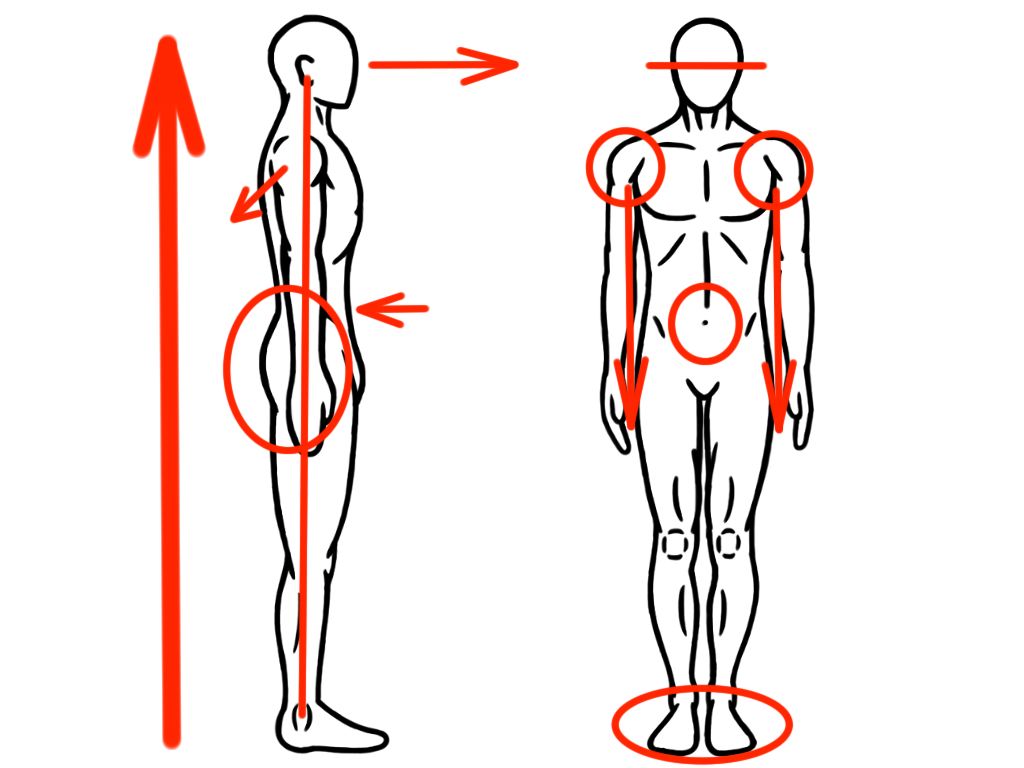
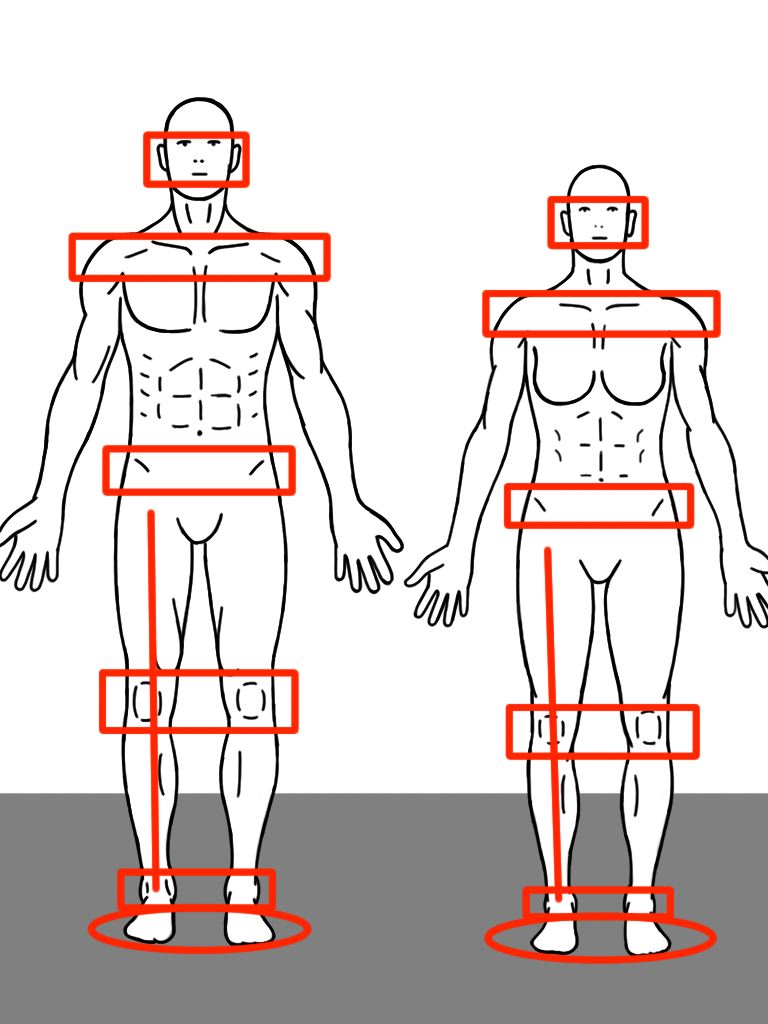
Alignment Diagram: Front View
Do you think you have level shoulders? Most people that I ask smirk and confidently nod their heads “yes.” Some even ask who’s shoulders wouldn’t be level, huh? The odd thing is that a large number of people have left-right asymmetry issues and do not even know it. Here’s a quick way to see where you stand – or better yet, how you stand with left-right asymmetries.
Stand in front of a mirror or take a photo of yourself.
Relax your shoulders and look at the horizon.
Now, march in place for 10 seconds and then stop.
Now, examine your standing alignment with these cues:
Is your head vertical straight? Look to see if your ears are level.
It’s better if they are.
Are your shoulders even with one another?
It’s better if they are.
Are your collar bones parallel to the floor?
It’s better if they are.
Are your hips even?
It’s better if they are.
Are your kneecaps even? Do your feet point straight ahead?
It’s better if they do.
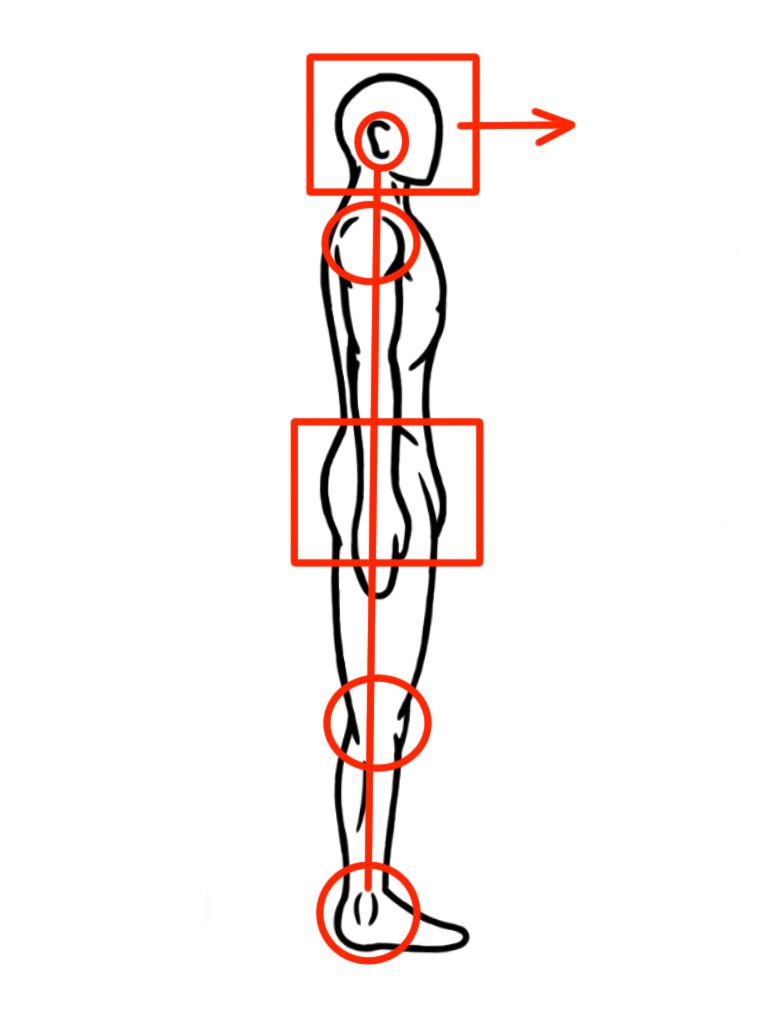
Alignment Diagram: Profile View
For this you need some help. You will need a ruler, a pen and someone to take a photo of you from the side. Set up the camera on one side of your body. The camera needs to capture your profile exactly. If you can see either the far hip, buttock or shoulder, you are not in profile position enough.
Relax the shoulders and look at the horizon.
March in place for 10 seconds and then stop
Now, take a photo of your standing alignment in profile.
Print out the picture and grab your ruler. Place the ruler right at the ankle bone and square it with the floor at 90 degrees. Next, draw a line from the ankle bone straight up through the top of the head.
Does the middle of the knee stack directly over the ankle bone?
It’s better if it does.
Does the hip socket stack directly over the middle of the knee?
It’s better if it does.
Does the shoulder joint stack directly over the hip socket?
It’s better if it does.
Does the ear hole stack right over the shoulder joint?
It’s better if it does.
Does the horizon land directly in the middle of your field of vision as you look ahead? Do you see an equal amount of sky and floor?
It’s better if you do.
How to find the hip socket and shoulder joint-
When performing these alignment evaluations, you need to know exactly what you are lining up, especially when it comes to your shoulder joint and hip socket.
Hip Socket: place the hands on the sides of your hips and press your thumbs into the indentation of the Glutes. Gently shift your hips forward and backwards as well as left to right. You will be able to feel where the hip socket is located through the juxtaposition of movements.
Shoulder Joint: place your hand over the opposite shoulder and move that arm around in small circles. Feel with your fingers where the arm bone intersects with the shoulder girdle. That’s the shoulder joint.
Time to Panic
Now, if your alignment is not what it should be, there is no need to panic. Instead, take on a new practice of aligning yourself with the first step of cultivating more awareness to your alignment on a daily basis. It took years for your alignment to become what it is and it will take time to change it. However, it will not change if you do not develop a more focused attention on what your alignment is in how you move. With a committed practice to develop mobility, activate essential muscles and create stability in your movement, PreHab will help you to cultivate better alignment over time.
Alignment in Other Positions: Plank Alignment
It’s important to evaluate your plank alignment. There are so many exercises and activation techniques that are employed in this position that doing this will help develop stability in the shoulders and core.
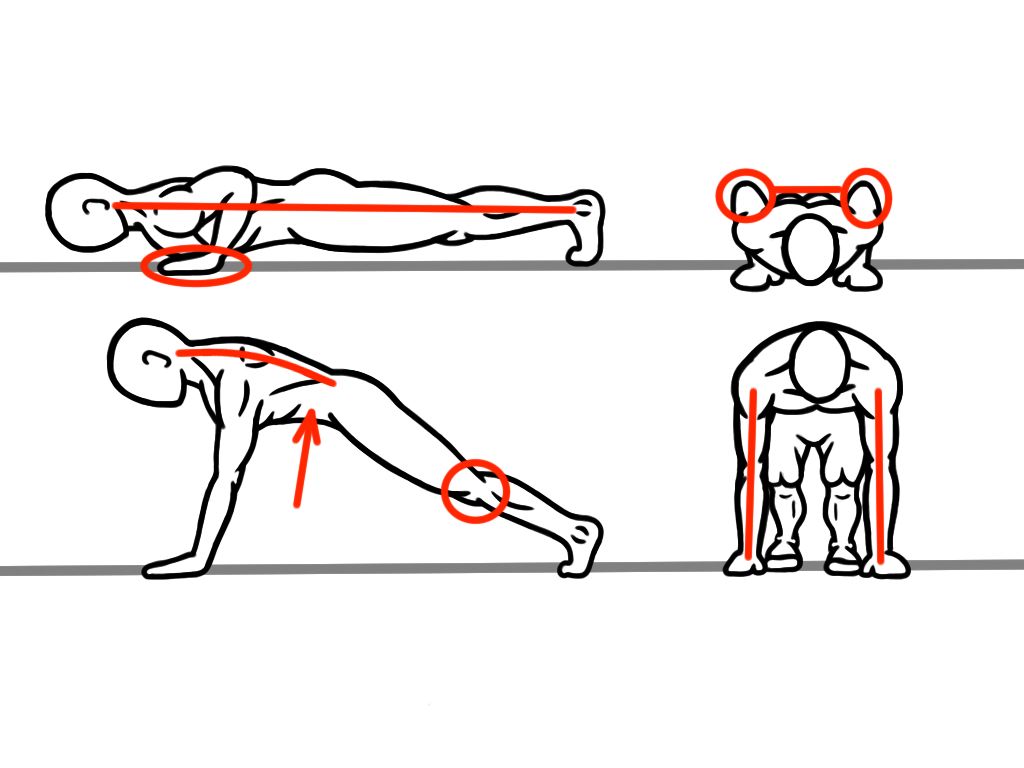
Lie on your stomach and place your palms flat on the ground along your rib cage. Align the heel of your palms with the bottom of your chest and pull the shoulders down and away from the ears. Tuck the toes under and fully extend the arms. First make sure that your elbows are straight and that your hands are shoulder-width apart. Pull your hands inwards if they are too wide and spread your fingers on the floor.
Next, stabilize the shoulders by squeezing the armpits down towards your front pockets and parking your shoulder blades into your back pockets. Pull the shoulders down and away from your ears.
Now, power up your plank hold even more by adding external rotation in the shoulder joint. Roll the belly of your biceps to face forward and screw your hands into the ground. Try to rotate the fingers towards the outside without lifting your hands off the ground. You should feel your shoulders tighten and widen.
Next, lengthen the entire body from head to toes. Reach the top of the head away from the tailbone while also pulling the jaw into your throat to make you feel as if you have a double chin. Feel the back of your neck becoming long and straight.
Squeeze the glutes and drive the hips towards the ground while you lift your kneecaps up towards the sky. Pull the belly button into towards the spine to engage the abdominals.
The natural “S” curve of your spine should transform into a “Hollow” position – an arch-like alignment with a shallow curvature. If the curve of your spine is too large or exasperated, you are compensating by creating torque and sheer on your spine. The curve is a minimal curve – approximately 5-10 degrees from head to hip.
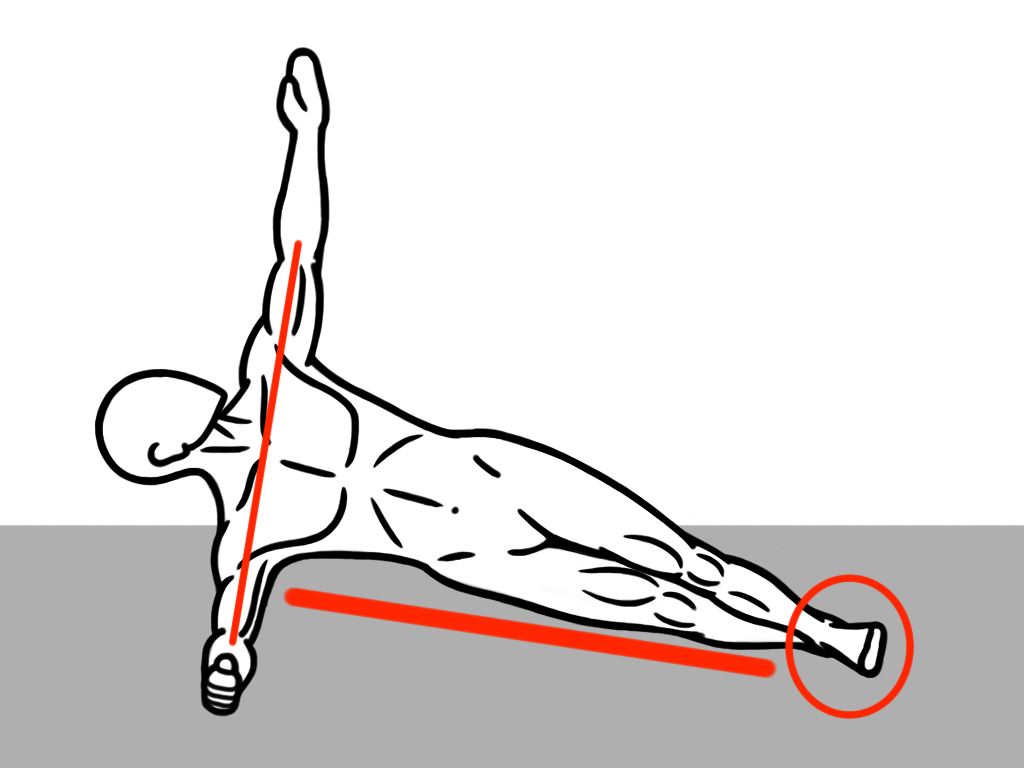
Alignment in Other Positions: Side Plank
Start in a plank position on your elbows with your arms folded over one another and the elbows directly beneath the shoulder joints. Position your feet at shoulder width and lengthen from head to heel.
Next, rotate over into a side plank by rolling the hips and shoulders 90 degrees and lifting one arm completely off the floor. Turn the feet as well and press the heels into the floor.Stabilize the bottom shoulder by pulling the armpit down towards the hips and parking your shoulder blades into your back pockets.
Use a partner or mirror to make sure that the bottom ankle, hip and shoulder are aligned in a straight line and that your shoulders are also stacked over one another.
Common Miscues:
Elevated shoulders cause tightness in the trapezius muscles and place extra strain on the cervical spine. Make sure that the shoulder joint is pulled down and away from the ear.
Misalignment with the bottom ankle, hip and shoulder may occur and look as if the hips bow up into the air or sag down towards the floor. In either case, there is excess torque place on the spine and it represents a dysfunction in this pattern, which can affect your lateral stability in other movements.
Shoulders or hips may fail to rotate and stabilize at 90 degrees due to tightness or weakness in this pattern. Make a personal note about this and refer to it for future assessments.
Lastly, compare the length of time that you are able to hold this position on either side. If the times do not match, it represents an asymmetry in your biomechanics and you will want to improve this over time as asymmetries increase your risk for injury.
Alignment in Movement
Let’s now take a look at our alignment in motion, specifically examining two aspects of our gait that can have a powerful impact in shaping the way we run and walk.
Hip Extension – Crucial Movement Pattern
Now, one of the main things that you will need to understand is that the entire body is related. Meaning, what happens in one area of your body, such as the feet, will affect the rest of the entire body. Let’s take a look at one crucial movement pattern, Hip Extension.
When I train at UCLA, I cringe when I watch hoards of co-eds run laps at Drake Stadium because their biomechanics are so restricted. And I have a pretty good guess why I see so many students on the track with warped biomechanics. UCLA is one if the best schools in the nation and all of these co-eds have certainly put their time in studying. Unfortunately, that probably means that they were hunched over a desk for hours upon hours doing homework. That’s all good, except too much sitting causes the Hip Flexors to grow tight, the glutes to turn off and the thoracic spine to collapse forward. So, when these coeds choose to run some laps and get exercise, an array of compensation shows up in their biomechanics.
Activate the Glutes
The glutes are your prime movers and you want them to be ready to fire whenever you move, especially when you walk or run.
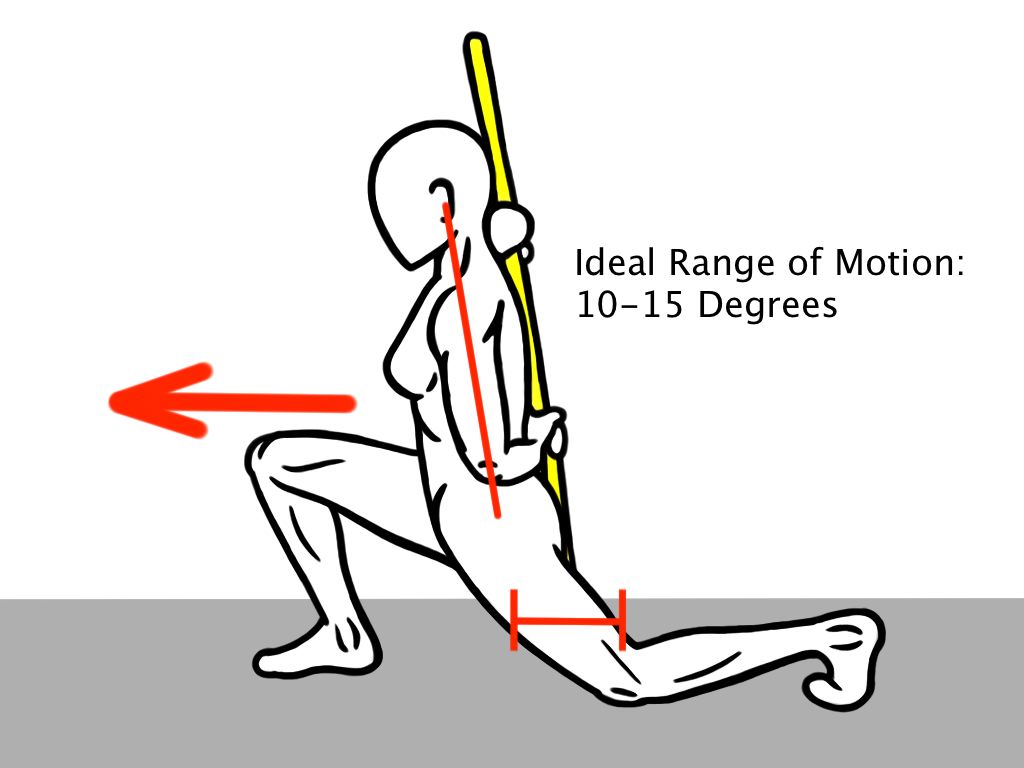
10 Degrees of Hip Extension
When you are walking, as well as running, your body is designed to use 10 degrees of hip extension. This means that your femur bone (thigh) needs to pass behind the midline of the pelvis while having a neutral and stable spine. A common compensation is that people will start to bend through their lumbar spine and break a stable spine position in order to help the leg pass behind the hips in the push-off phase of our walking or running gait. A compromised spine will do no good for anyone!
Activating the glutes is a way to help biomechanically restore hip extension to your gait as you walk or run.
Compensation
Unfortunately, the importance of hip extension is not a testable topic on the SAT’s. If it were the nightly scene at UCLA’s Drake Stadium would look very different.
I can still see how many of these coeds run in my head: shoulders slouched forward, necks protruding forward like tired geese, hips bending as if they are doing a hundred shallow squats and their feet slapping on the ground with every step as they grimace and listen to their music through their headphones.
The real amazing aspect of this picture is that these coeds will tough out hundreds of laps a year with horrible form but a lot of determination. At least it gives me some assurance that they will put forth a lot of devotion in their future careers as engineers, doctors, visionaries and more! These coeds are a testimony of the resiliency of human beings. However, there’s at least one lesson I hope they can learn before graduation. Exercise, let alone movement, does not need to be punishing.
PreHab Prescription
The more that you include Glute activation exercises into your daily routines, the stronger that neuromuscular connection will grow. It will take time to create a high level of proficiency, but it worth the effort.
First Stage
Repetition will be key to enhancing this neuromuscular connection to activate the hips. Simply start by incorporating at least two Glute activation exercises to your daily routine, and in a matter of weeks, you’ll turn this into a habit.
Second Stage
Once you develop a habit of including Glute activation into your daily routine, raise your standards and get creative. You will soon find that whenever you are, sitting in a meeting, having a conversation with someone, or stretching out your Hip Flexors, you can easily activate the glutes.
The glutes are your prime movers, so practice activating them often and thoroughly. Don’t settle for trying. Feel them turn on and know that your glutes are activated. You’ll see a difference in how you perform in everything.
Activating the hip muscles will protect the biomechanics of the knees and ankles as well as help prevent possible non-contact ACL injuries.
Much on what I see in the student population related to their biomechanics as they walk across campus is a lot of “collapsing” in the ankle or excessive pronation of the foot which is a precursor to ACL and knee injuries. This collapsing of the ankle while walking usually correlates to a lack of lateral stability in the entire leg due to an under-active Gluteus Medius.
The Gluteus Medius is responsible for stabilizing the leg from the hip downward. It will create enough tension between the pelvis and the femur to help keep the knee aligned with the ankle and hip socket. When this muscle is under active, the ankles tend to roll inwards and down towards the floor. And it collapses due to the weight of the body loading through the joint without the adequate support from the hip above to hold it in place.
Over time, the collapsing of the ankle will place additional stress on the knee complex and the infamous ACL. The knee is a designed to track in a precise way. Yet, when there is instability at the hip socket and the ankle is collapsing inwards, the tracking of the knee is skewed and endures angular displacement that compromises it’s own stability.
This entire process is quietly propagated by specific lifestyle factors that help create an inactive Gluteus Medius. Just looking at the student population at UCLA is a perfect example. They have the unfortunate lifestyle of sitting for a prolonged amount of time, hours upon end in fact, in class or sitting to study. The act of sitting turns off the glutes and also decreases the habitual firing of these muscles, which makes it worse because when they finally get up and walk across the campus they have a lack of force production from the hips!
Another drawback to this sitting culture that coeds and many others around the world endure is that when we sit, our quads and Hip Flexors grow tight and we lose length in our stride. This makes us slower when we walk or run and it also makes us shorter because it is harder to extend through the hip. The quads and Hip Flexors are the muscles working to keep our spine stable in a sitting position. They respectively attached to hold the pelvis in place and spine vertical. On top of that, these tissues start to refashion and reinforce themselves in a shortened position. In other words they get stronger and tougher to lengthen the longer and the more often that we sit. Conversely, our glutes get weaker due to inactivity the longer we sit. This inverse relationship spells disaster. It’s the exact reason a very smart coed can look as if they are sitting while feverishly running laps!
Toes Forward – Support the Ankle and Protect the Knee
One of the most common biomechanics faults that exist in our population today is ‘toes pointing out.’ The proper alignment of our feet is ‘toes forward.’ However, many of us begin to develop a compensation pattern all because of sitting. The more often that we sit, the more likely of hip musculature gets ‘turned off’ or inhibited, meaning that there is a lack of neuromuscular impulse to the muscle fibers because there is a lack of demand to use these muscles.
In other words, our hips, specifically the Gluteus Medius, does not need to fire because when we sit there is no need to lateral hip stability unlike when we stand. However, many of us sit for so long that this neuromuscular connection almost dies out completely. So, in order to compensate for the impeding lack of lateral stability that the hips should provide, our bodies begin to turn the toes outwards in an attempt to build a larger base of support down below.
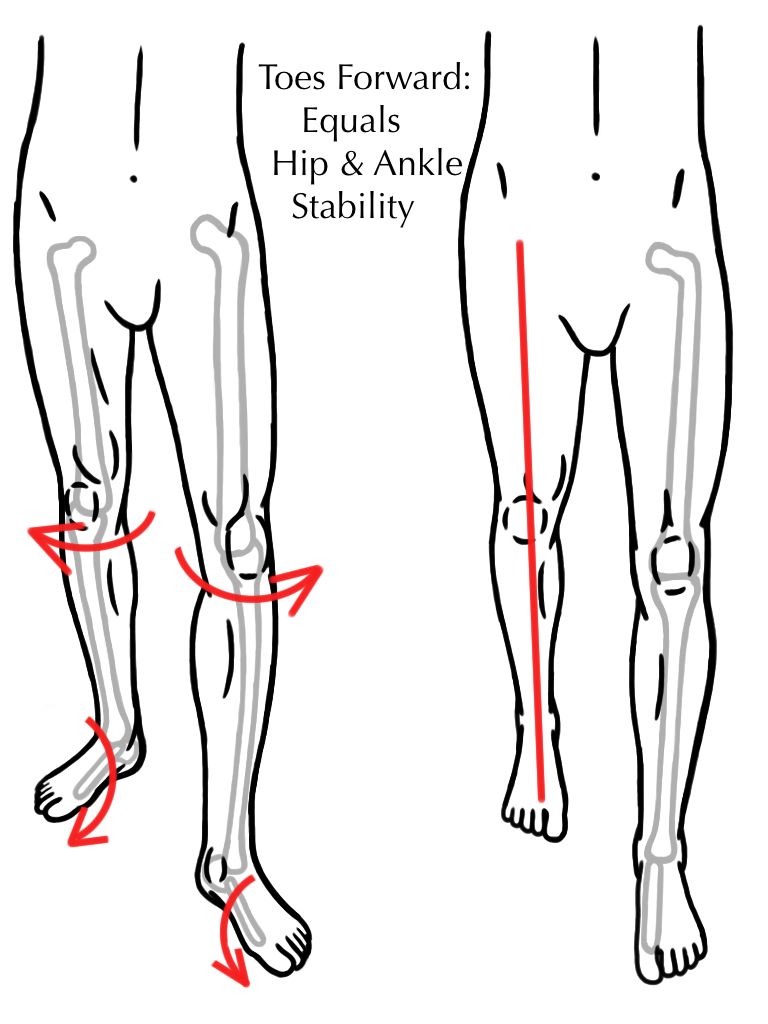
‘Toes Out’ can eventually lead to knee injuries, specifically ACL tears, when competing or training because the foot cannot support the ankle properly, which puts more pressure on the ACL to keep the knee tracking in its own groove. To remedy this ‘toes out’ alignment, begin to practice Soft Tissue Therapy on the legs and feet while combining a healthy dose of Activation and Stability exercises for the Ankle and Hip.
A collapsed ankle will skew the knee’s tracking.
Believe it or not, sitting and all else that you do is slowly reshaping your body and creating a new alignment that may actually be holding you back from performing your best and getting the most out of your training. Yet, if you made it this far in this article, you are in good standing because you now know how important your alignment is to your performance.
Practice Standing
Once you have developed a sense of what it feels like to activate the muscles of your hips, try to keep the glutes turned on as much as possible – even when just standing!
The more that you practice using this neuromuscular connection, the more facilitated it will become. In other words, the more that you practice squeezing your glutes, the easier it is to recruit them when you go to run, stand up or just move!
And once movement gets easier for you, you will move more often. And that’s great in a world where sitting is predominant. So, stand up and get moving!
Recap-
Just remember that FORM EQUALS FUNCTION and if you really want to perform your best, start by focusing on your alignment in all that you do! Conversely, you will soon find that all that you do, such as sitting and texting, will also shape your alignment, which can help you make better lifestyle choices and become more effective in your training. Yet, don’t make a mountain out of a mole-hill just yet. Let’s just focus on improving your Alignment as much as we can each and every day, and the other lessons will fall into place when we are ready.
Start by sitting less!
Develop a Soft Tissue Therapy Practice – CLICK HERE
Start with Foam Rolling Basics – CLICK HERE
Turn on the Glutes, the Prime Movers – CLICK HERE
Address the Alignment of your Head and Neck – CLICK HERE
2 thoughts on “Alignment – Form Equals Function”